To really get going with Mac OS X you need X11. Even if you
already have a version installed, I recommend
installing the latest version of xquartz. It's an easy package installer. My reason for recommending xquartz is that "Spaces" (which we'll discuss later), Apple's proprietary software for splitting
your
screen
across
multiple
desktops, can be painful without an up-to-date version of xquartz.

| X11 opens a default window when I click on the icon
|
The ghost
in the machine |
OK, so now you have X11 but it has
an irritatingly gui-esque habit
of opening a single, boring, default X11 window
when you click on the
icon. If this doesn't annoy
you at first, it will when you
become an X11 sophisticate with
sui generis customizations.
The trick here is that Apple's new launchd client is typically already running
a server for X11 in the
background when you click
on the X11 icon.
Thus Apple assumed that clicking on X11 was tantamount to requiring one
xterm. To nix this behavior, tell launchd to start a different
application upon an X11 launch.
Typing this at any X11 prompt worked for me:
prompt> defaults write org.x.X11 app_to_run
/usr/X11/bin/xlsclients
I found this hack here.
|
| Unix Shells
|
An Introduction
for Those Uninitiated
in the Arcane Ways of Unix |
This is an IMPORTANT ASIDE FOR GRAD STUDENTS AND ANYONE WHO ISN'T
USED TO USING UNIX. Unix is
based on a system based on a system
that was based on a system, and,
consequently, it's a bit like an
onion. Historically, there have been
many layers, and
different people are comfortable
working with a different layer. In
UNIX speak, these layers are called
SHELLS. A Mac OS xterm will open in the
bash shell, BUT I USE THE tc-shell
and EVERYTHING
WRITTEN BELOW WILL ASSUME
THIS. Thus, if you're
entirely new to UNIX you're now a
tc-shell user. Welcome.
To make sure you're ALWAYS IN THE tc-shell you
can do several things. You could
type "tcsh" every time you open an
xterm but this is laborious
and you're bound to forget at
some point, so I suggest, when you
double-click on the X11 icon, to
go to Applications on the X11 Toolbar, and under
the Customize option create a Name,
say, "xterm" that contains the
following command (see a screenshot of this):
xterm -e tcsh &
Now, when you run this command from the toolbar, you'll
automatically be in the
tc-shell rather than
bash. If you want a
snazzier feel to your
xterms create a Name,
say, "small xterm" that contains the
following command:
xterm -fg white -bg black -sb -sl 500 -geometry 78x24+528-48 -n main -e tcsh &
Try it! Particularly useful is the -sb flag, which creates a
scrollbar. The command
options, or flags, are
described in detail in the
manual (type "man xterm" at
any prompt).
| Initialization Files
|
Start As You Mean
To Go On |
OK, now you're constantly in the tc-shell when you run X11, you'll need some initialization files in your home
directory (i.e. most importantly ~/.tcshrc). There
are handy examples on your hard drive at
/usr/share/tcsh/examples/, or you can have a
look at abbreviated versions of mine. At the minimum, I recommend
sourcing the .login, .logout and .tcshrc
files in /usr/share/tcsh/examples. By
"at the minimum sourcing", I mean creating a file
called ".tcshrc" IN
YOUR HOME DIRECTORY that contains only the
line "source
/usr/share/tcsh/examples/rc", creating
a second file called ".login" that
contains only the line "source
/usr/share/tcsh/examples/login" etc. (see
/usr/share/tcsh/examples/README). You can
"create" these files using a simple
editor such as pico (type "pico" in an
xterm). Or by typing,
e.g:
prompt> echo "source /usr/share/tcsh/examples/rc" >> ~/.tcshrc
at the prompt. (~ is a UNIX abbreviation for your home
directory). Once these .files
are setup, X11 should work fairly well.
NOTE: DO NOT try to create text files for UNIX using the Macintosh clipboard/notepad/copy-paste function or a Mac-based editor such as Simpletext or *shudder* MSWord as these create files that have rich-text-style Meta-formatting that is gibberish to UNIX.
|
| How do I set my Default Login Shell (and forward Xwindows) for Remote Logins?
|
Just in case things aren't setup right... |
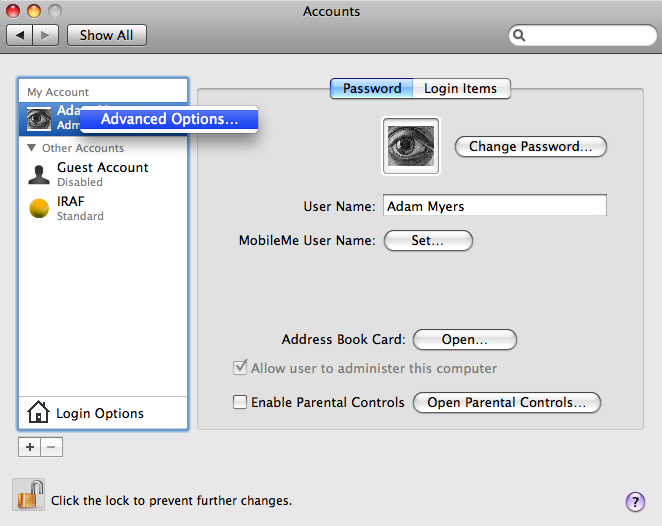
It is worth pointing out that nothing in the above officially sets your default login shell to tcsh. If you login remotely, your system will not be aware that it's meant to be in tcsh before running any of the initialization files. This hasn't been a problem for me circa Leopard but as of Snow Leopard the good people at Mac are investing heavily in gnu bash 4.0 as their default, which may trip some things up.
One THING TO CERTAINLY DO if you're having problems remotely logging into xwindows is to check that you have xforwarding set in /etc/sshd_config. Simply edit that file to change "X11Forwarding no" to "X11Forwarding yes". Now see if you can login with ssh -X me@mymachine and make everything play nice.
In addition, there are two simple alternatives that should absolutely ensure your default login shell is tcsh.
A bit of a hack but it will work, is to add the line "tcsh" to the very start of your .login file discussed above. Thusly, when you login, the first thing that will always happen is that you'll be jacked into a tcsh shell.
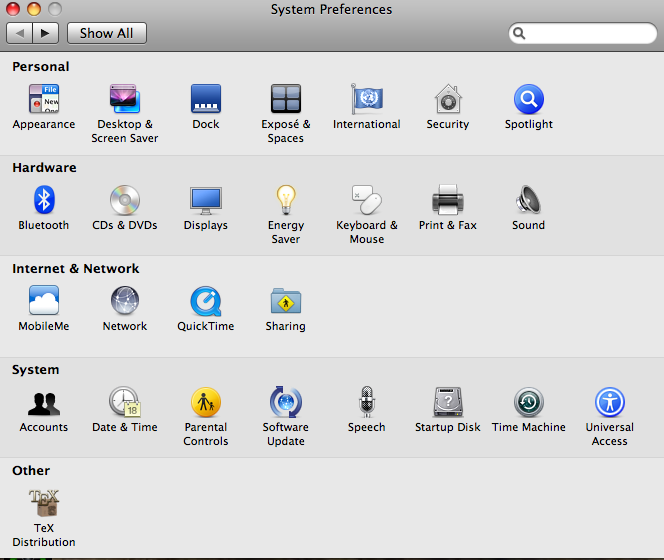
An alternative is to set up your default user shell in a more systemic way. A snazzy GUI-based way of doing this is to go to "System Preferences" under the apple menu and click on "Accounts" under the "System" panel. Now, make sure you've "Clicked on the lock to make changes" and then click on your account under "my account" while also holding down the ctrl key. A sneakily concealed advanced options menu will appear (see this). Click on this and then under the next panel you can set your default login shell for that user to tcsh. Hat tip to mac os hints.
| Spaces:
Virtual Desktops
|
Split your screen
into multiple desktops
|
As of 10.5 Mac OS X ships with an application for
splitting
your
screen
across
multiple
desktops, called Spaces. In a highly un-mac-like fashion, Spaces kills many perfectly good older virtual desktop apps such as the excellent and popular Desktop Manager. Hyperspaces is a project akin to Desktop Manager but Spaces doesn't quite suck enough, once you set it up properly, to install anything over it.
Spaces can be accessed in the dock but because it's set up to tie each
application to a single desktop space, it tends to try to drag
all of your X11 windows onto a single desktop.
There are some tricks to help make Spaces work more intuitively and to
allow you to split X11 across multiple desktops. Installing the most recent version of Leopard from Software Update helps. Installing the most recent X11 from the xquartz project helps a lot.
After these various installs, Spaces should allow multiple x11 windows across multiple desktops with
occasional persistent clicking. It seems to work perfectly if you also set up Focus Follow Mouse (sloppy mouse) behavior. To get traditional X11 focus-follows-mouse behavior rewrite the X11
parameter list defaults by entering the following
commands at the prompt
prompt> defaults write org.x.X11 wm_ffm true
prompt> defaults write org.x.X11 click_through -bool true
(Tip on ffm in Leopard from here)
|
| MacPorts
|
MacPorts is a useful way of installing
OS X software |
I used to use an application called
"Fink" to rapidly install useful new software on my Mac. However, I now use MacPorts instead, although Fink is still available.
The builders of MacPorts maintain
their own excellent documentation and the instructions
on their site should allow for easy installation. Once you install it you'll need to add "/opt/local/bin" to your path in .tcshrc; e.g., add this line:
set path = ( $path /opt/local/bin/ )
to your .tcshrc file. For those who remember Fink, /opt is MacPorts
version of /sw and is just a directory to ensure that MacPorts installs are kept separate from everything else.
As an example of using MacPorts at the command line, once
you've installed it, try the following at the prompt of a (new so that .tcshrc has been reinitialized) shell:
prompt> sudo port selfupdate
prompt> port search ghostview
prompt> sudo port install gv
Now open a new shell and type
prompt> gv
Note that you had to type "sudo" to
get root privileges (and were probably
asked once for your user
password), which will
be a recurring theme below.
Some handy software you might want to use MacPorts to install
 "gv" - the
postscript viewer "gv" - the
postscript viewer
"xemacs" - a better class of text editor
"gimp" - the image manipulation software
"abiword" - looks a lot like Microsoft Word but it's free
Note that these can take a long time to install and it's probably worth
setting the MacPorts installation going
overnight, or when you
don't need your machine.
NOTE:
Version dependencies, libraries etc. don't always play nice. For this reason, it's probably worth always going through the rigmarole of installing the latest versions of compilers from scratch. I would at least install gfortran and gcc from the GNU homepages or, at least, always install these compilers from the same source (don't for instance, install gcc from the GNU homepage and gfortran over MacPorts).
|
| Python,
Numerical Python and IRAF
|
IRAF, Numerical Python,
SLALIB, PGPLOT; Scisoft covers all
the bases |
Although Mac OS X ships with
Python, it doesn't
ship with all of the
Numerical Python
modules. Astronomers will
probably also need IRAF at some point, and this
can be a pain to install. Scisoft neatly solves all of these
problems and more.
SNOW LEOPARD NOTE: Britt Lundgren at Yale points out that there have been some problems installing scisoft on Snow Leopard (OS X 10.6) and that these notes may be useful
Download the latest version of Scisoft
for Mac OS X. Once it
unbundles, it's an
easy point-and-double-click install.
It should install everything in a
directory at the /Applications level called
/Applications/scisoft, which you may need to source
by adding
source /Applications/scisoft/all/bin/Setup.csh
to your ~/.tcshrc file.
You'll find after the
installation that (important things like)
python and IRAF will now run from the scisoft
binary
prompt> which python
/Applications/scisoft/i386/bin/python
prompt> which ecl
/Applications/scisoft/all/bin/ecl
If you install Python using the latest version of scisoft, you should also get Numerical
Python (numpy) and the Scientific Pythons (scipy and Scientific) without any further problems.
|
| VNC
|
Be there when you aren't there
|
Virtual Network Computing (VNC) is a system which allows two computers to share the same desktop. This means you can, say, control your office computer remotely from your home computer, or a laptop, exactly as if you were sitting in front of it. For earlier incarnations of Mac OS X, I used Chicken of the VNC, which is still a great user-friendly front-end. As of Leopard, Mac OS X ships with its own VNC interface, which you can use directly as noted at ihackintosh:
First, to set up the Mac you want to remotely control (the server):
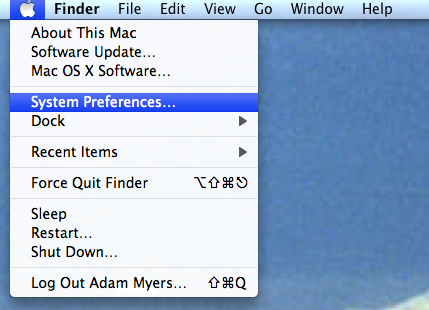
Open "System Preferences" (see this)
Select the "Sharing" panel under "Internet and Network" (see this)
Check the "Screen Sharing" box (see this)
A green button will light up with "Screen Sharing: On" and then smaller text stating "Other users can access your computer at vnc://computername"
Note down the name of your computer for vnc access (you'll need this in step 2, below when setting up the client)
Check the "All users" button under "Allow access for" (or, check "Only these users" and fill in which users on the local machine you want to be able to control the desktop)
Click the "Computer Settings" button
This will reveal a new window under which you should check "Anyone may request permission to control screen"
In the same window check the "VNC viewers may control screen with password" box and choose a password. This option allows computers running VNC software, such as Chicken of the VNC to access your machine
Now,to access the server Mac from a remote machine (the client):
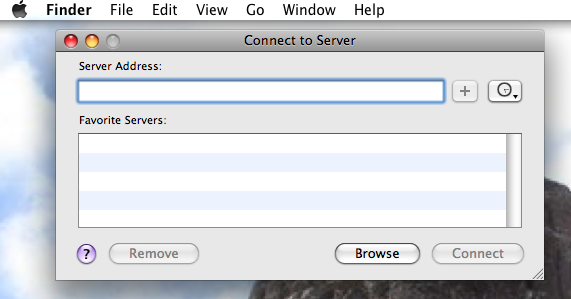
Click on the background of your desktop to call Finder, then press the "command" key and "k" together. This will bring up a "Connect to Server" window (see this)
Input "vnc://computername" (or "vnc://ipaddress") for the VNC server to which you wish to connect (see step 5, above, under setting up the server)
If the server is using another port besides the default (5900), add a colon and the port number after the computer name (or ip address)
Click the "Connect" button
If everything runs smoothly, you will have the option to connect as a registered user or by asking for permission
If you elect "registered user" you will need to enter a username and password for an account on the server computer
If you elect to "ask for permission" someone will need to be at the remote computer to click "allow"
| SuperMongo
|
SM is a handy
plotting package but it is not
freely available. If you don't have a license
(Illinois astronomy does), you can
buy it here
|
NOTE: I no longer
use SuperMongo so have not tried out these installation instructions. If somebody successfully installs SM on Leopard and needs to deviate from the instructions below, let me know.
NOTE2: The good people at scisoft now provide an installer for SM. If you mail them and state you have an SM license they will likely provide you with their installer, which is simple point-and-click.
Graduate students (etc.) in
Robert's group can ask me for
SuperMongo and I'll supply
them with the tarball. I
recommend installing it in
/usr/local as this is the
default for many other
installations.
Assuming the SM tarball is on your Desktop (and that
you've already got a
directory /usr/local and
don't have to make it first), start
by unbundling the tarball in
a /usr/local/sm directory
prompt> sudo mkdir /usr/local/sm
prompt> cd /usr/local/sm
prompt> sudo mv ~/Desktop/sm2_4_20* .
If the tarball hasn't already been unbundled by StuffIt Expander, unbundle
it.
prompt> sudo tar -zxvf sm2_4_20.tar.gz
A directory with the latest SM version number will be created and we're
ready to configure the install.
prompt> cd sm2_4_20
prompt> sudo set_opts
You will now be asked some questions. Just hit "return" for the
default in all cases, except when asked what device to use - you should type "x11" and then hit "return". When set_opts has (successfully) exited, edit the src/options.h file as prompted to remove the first seven lines of comments, accepting that you're licensed to use SuperMongo. Now everything should make without a hitch.
prompt> make
prompt> sudo make install
NOTE: Cedric Grenon, a grad student at Queen's
University in Kingston, Ontario points out that on his MacBook Pro running 10.5 (Leopard) he encountered a "/usr/bin/ld: cannot find -lX11" error, which he solved by changing the following line in the Makefile (src/Makefile):
substitute XLIB11 = -lX11 for XLIB11 = -L/usr/X11R6/lib -lX11 (first you should mv up to the /src directory).
As I noted, I don't use SM anymore but have found in general that adding -L/usr/X11/lib to the architecture flags in Makefiles (note the drop of "R6") finds the X11 C libraries on my machine.
You will need a .sm file in your home directory (see my examples). Supermongo will still run without a .sm file but only with certain annoying font and key-mapping problems, so create a .sm file. Unless it's already there, /usr/local/bin will need to be added to your path in your .tcshrc file (see my examples). Now, typing "sm" in a (new) shell should take you to the sm prompt and bring up an X11 interface.
If you've never used SM before there's a tutorial. If you've used it before and still have problems, it's always a good idea to RTFM.
|
| Hosting Web
Pages
|
Publish documents
on
the
WWW
|
To turn on Apache (the webserver) on your Mac, click on the Apple icon and then "System
Preferences" and select "Sharing" under "Internet and Network". Now click the box marked "Personal Web Sharing". Your Mac will inform you of two possible websites; the computer website and your personal website.
To publish a user home page hosted on your Mac, modify the index.html
file in ~/Sites. To publish a home page at your Mac's website, modify the index.html file in /Library/WebServer/Documents. If you're comfortable with your knowledge of web security, you could also publish CGI scripts in /Library/WebServer/CGI-Executables.
|
| Backing Up
Directories: Time Machine
|
Time Machine is by
far the nicest thing about Leopard
|
Whichever Apple employee came up with Time Machine deserves a huge
bonus. Already I know of 3 people (myself included) using Leopard that suffered a system crash. This has happened to all of us before (usually right before we saved our undergraduate end-of-term reports onto 8-inch floppy) and it has historically been incredibly painful. Now, if you have Time Machine turned on, and an external drive connected to your machine, when you reboot after a crash you will be asked from which version of your machine you would like to restore, in various time intervals, going back as far as you have had available backup disk. It works (almost) seamlessly.
Time Machine is so very, very special that about all I can say about it
is that it really, really makes it worth
spending a hundred bucks on an
external drive. Also, If you reduce large amounts of data while running other code, playing around in IDL and writing Tex documents (like me), and you find that the hour-long backups of Time Machine can slow you down...well, you can always change that.
If you don't have an external device to back up to, and would like to utilize some sort of complex central storage approach across a network, there's always my old pre-Leopard script. This should still work just fine but will require reading up on key encryption and how to automate scripts using cron or launchd in Leopard.
|
| I restored
using Time Machine and my web pages vanished!
|
Bugs: nothing new
under the Sun but lots of old things we don't know
|
If you notice that after a Time Machine restore, all of your web pages
have died, that's because Time Machine has failed to restore Apache.
These commands (from here) should reinitialize Apache
prompt> sudo apachectl stop
prompt> sudo mkdir /var/log/apache2
prompt> sudo chown -R root:wheel /var/log/apache2
prompt> sudo chmod -R 755 /var/log/apache2
prompt> sudo apachectl start
This will turn Apache off, create the Apache logging folder with the
correct permissions, and then turn Apache back on. This is all due to a bug in system restore which has been reported to Apple, but who knows when it will be fixed.
Hey, maybe it's fixed already.
|
| TeXShop
|
Native TeX for Mac
OS X
|
The best version of TeX that we've come across for Mac OS X is TeXShop. It's quite a complicated installation but it's very well documented. One splendid feature of TeXShop is the ease with which you can typeset a document in real time as you code it. I think it installed first time on my Mac (and it should, 'cos it's written in Cocoa) but if anyone in the group has installation problems, mail me and we'll make a note here. There are also a number of nifty TeXShop add-ons, including GUI support for equations and bibliographies here.
Being native to Mac OS X TeXShop always uses pdf rather than
postscript. You can still include encapsulated postscript figures, though, if you add to or modify the documentstyle command to resemble
\documentstyle[epsfig,epstopdf]{mn}
Or, if you don't have a documentstyle command Adam Rengstorf suggests this alternative
\documentclass[12pt,preprint]{aastex}
\usepackage{graphicx}
\usepackage{epstopdf}
The {mn} and {aastex} commands here are, of course, examples of style
files used by two popular astronomy journals. Alexander Karim points out that this will still fail with certain versions of TexShop unless you go to the "Typeset" drawer and choose "TeX & DVI" instead of "pdftex".
|
| CVS/Kerberos
|
Kerberos and the LCDM common
user repository
|
Robert Brunner has written a pdf document on how members of the Laboratory for Cosmological Data Mining can use CVS to back up files to the LCDM common user space. This is particularly useful for keeping track of pieces of software that one of us has written but that we all might want to use and for keeping tabs on which version of a piece of software we've written works.....
NOTE: the first section of
Robert's document
also contains a
useful tutorial concerning setting up the network authentication protocol Kerberos on Mac OS X. Basically, Kerberos is a protocol to create authentication tickets that enable you to securely move between networked machines. I've put the edu.mit.Kerberos protocol file that worked for me in my examples.
To extend Robert's instructions on setting up the CVSROOT environment variable: If your ncsa username differs to that on your local machine, you could set CVSROOT in the following manner (this, of course, is the c-shell example - Robert tends to give bash shell examples):
prompt> setenv CVSROOT ":ext:username@cvs.ncsa.illinois.edu:/CVS/lcdm"
NOTE: before setting up
CVS, you will need to mail the ncsa helpdesk and ask for access to the CVS repository.
|
| Public/Private Key Encryption
|
Access remote
accounts without typing a password
|
Adam Rengstorf supplied me
with a way of setting up public/private key encryption so that you can access a remote machine without having to type your password. First you need to generate an access key....type
prompt> ssh-keygen -t dsa
and accept the default directory for storing the key. Enter an empty
pass-phrase, too. Note that typing "sudo" before "ssh-keygen" will generate a pass-key for root.
Now, ftp into the remote machine and transfer the file generated by
launchd keygen ("id_dsa.pub" - keygen will echo which directory it stored the file in) to your (remote) home directory.
Finally, log into the remote machine that you want free access to and
append the information in the key-file to your .ssh/authorized_keys file (or create it if it doesn't exist)
REMOTE MACHINE prompt> cat id_dsa.pub >> .ssh/authorized_keys
Now, to see if it works, open a window on your machine and ssh to the
remote machine
prompt> ssh remoteusername@remotemachinename
Access should now be granted without inputting a password. Of course, if
"remoteusername" is the same as your username on your machine, there's no need to enter it. If you typed "sudo" before "ssh-keygen", then it's root whom has free access and you will have to type
prompt> sudo ssh remoteusername@remotemachinename
unless, of course, you're powerful enough that you could store the key in root's home directory on the remote machine.
|
| Customizing arXiv
|
Why waste time
trawling new arXiv listings that don't interest you?
|
NOTE: I updated astroph.py to
version 1.03 on April 30th, 2008 to reflect a change in arXiv's primary url for astrophysics abstracts. If you have an earlier version you may want to grab the newer version.
Obviously, we don't always have time to read every entry on
arXiv. Further, it's a known effect that being listed higher on arXiv increases your exposure, hence biasing citation rates.
I've written a handy little Python script that will grab the new
arXiv listings page, select only those abstracts that interest you, and open a browser window to display the results (kind of an Arxivsorter that you can control yourself). It should be reasonably functional on any platform that runs Python but has certain features that are geared specifically to Mac OS X. It runs from the command line. You can get it here (on Mac OS X; place your cursor over astrophApr2008.py, the most recent version, hold down the alt/option key and click the mouse-button once).
By the way, if you found this code useful, consider linking to my website
as a courtesy, rather than just passing the source code around.
If you downloaded it to the desktop, you can check it works by
double-clicking the astrophApr2008.py icon, then double-clicking the generated applescript bundle. It should return today's arXiv new listings with the default search parameters. The easiest way to run astroph.py with customized parameters is to run it under UNIX (from an xterm). So put it in a directory that's in your path (such as /usr/local or .). Here are some of the most common example uses:
prompt>python astroph.py -help
Print a help message and usage options
prompt>python astroph.py QSO supernova -v star
A basic search that will reject all occurences of star and
then return today's arXiv abstracts that contain
QSO or supernova
prompt>python astroph.py QSO supernova -v star -ho
The same search with -ho, the highlight option, flagged. This will
return arXiv with all occurences of star highlighted
in red, all occurences of QSO or supernova
highlighted in green and the abstracts ordered so that matches with
QSO and supernova are at the top of the returned page
and matches with star are at the bottom of the returned
page
prompt>python astroph.py cluster group quasar
QSO lens supernova ' AGN' correl -v star magnet globular branch
As an observational cosmologist interested in
quasars, large-scale structure and lensing, this is something like my typical search (I change it as my interests evolve). The quote
marks around AGN force a space before the word, meaning that words
like 'mAGNitude' will not be searched for. Alternatively, the -cs
flag could be used to make the search case-sensitive.
NOTE: it is inadvisable to run astroph.py as
root as it will write to directories as root rather than as myusername and subsequently running it as myusername will fail to overwrite these directories. From the command line, astroph.py will halt with a warning message if you run it as root. You can force it to run as root by adding a -root flag, if this is what you really intend to do.
If you want your typical arXiv new listings to pop up daily without prompting, why not
set up a cron or launchd job? Read on...
|
| Cron and launchd
|
Automating your
code - the old right way and the new right way
|
Say you've created a piece of code and you
want it to run every day. The old right way of doing this would be using the scheduling daemon cron, which would read scheduling requests from your crontab file. Lines in the crontab file would look something like this
00 6 * * 1-5 myuserame /Users/myusername/scripts/astroph.csh
if, say, you wanted to regularly run the astroph.csh script as myusername (in this
case every weekday morning
at 6am).
crontab still exists in some form in Leopard. You can edit it with (where myfavoriteeditor is, e.g., pico):
prompt> setenv EDITOR myfavoriteeditor
prompt> crontab -e
Populate crontab with a request, as outlined above, restart your
machine, and your crontab should be running.
As of Leopard, crontab is completely deprecated and is now just a front end for launchd, Apple's uber-scheduler, so it's
probably worth just taking a little time to learn how launchd works.
First make ~/Library/LaunchAgents/ (if it doesn't exist already)
prompt> mkdir ~/Library/LaunchAgents
Now, copy some example files into ~/Library/LaunchAgents while changing their names into something more user specific:
prompt> cp /System/Library/LaunchDaemons/com.apple.periodic-daily.plist ~/Library/LaunchAgents/com.$USER.periodic-daily.plist
prompt> cp /System/Library/LaunchDaemons/com.apple.periodic-weekly.plist ~/Library/LaunchAgents/com.$USER.periodic-weekly.plist
prompt> cp /System/Library/LaunchDaemons/com.apple.periodic-monthly.plist ~/Library/LaunchAgents/com.$USER.periodic-monthly.plist
Just looking at the xml for these files should usefully indicate how you
make daily, weekly, and monthly periodic jobs. For instance, the default for
the periodic daily has "Hour" and "Minute" keywords, probably set to the
defaults "3" and "15". If you wanted to run something every day at 8:30am,
you would change these keywords to "8" and "30". Note that one keyword that
isn't in the example files above is "Weekday". Feel free to add it. It takes the
integer values 0-6 for Sunday-Saturday, as in the cron formalism.
Storing these files in ~/Library/LaunchAgents runs them locally for you
as $USER once Apple's uber-scheduler, launchd, knows about them. The
easiest way to initialize these files for launchd is using the launchctl command, e.g.
prompt> launchctl load ~/Library/LaunchAgents/com.$USER.periodic-daily.plist
but launchctl is pretty powerful stuff, and can be used to start and stop all sorts of
things (actually, technically it can be used to start and stop everything),
so make sure you know what you're doing...particularly if you try
invoking the "unload" command!
Another (safer, if you're unsure) way of starting LaunchAgents
is by restarting your machine.
If you like GUIs then Lingon can do a lot of this for you (note that you will still have to create
the ~/Library/LaunchAgents directory if it doesn't yet exist).
|
| no more processes
|
The zombies that won't die
|
After installing 10.5, I began to notice that my machine would sometimes freeze up and inform me that "no more processes" could be run. This was somewhat surprising as, although I run a gazillion things simultaneously, this hadn't happened to me on a UNIX system for nearly a decade. A quick
prompt> ps -e
reveals that a lot of these processes are related to Address Book synching. I found that closing and restarting Apple's Mail had the effect of killing the processes (which, eventually will begin to spawn again). The problem appears to be that Mail is not informing zombie processes when it is finished with them. Killing Mail every few weeks (in my case) is a somewhat unsatisfying solution. It does seem to work, though. Failing that, rebooting your machine, or at least logging out-and-back-in should kill the zombies.
|
Department of Physics & Astronomy, University of Wyoming,
1000 E. University, Dept. 3905,
Laramie, WY 82071, USA |

|
 |
 
| Page maintained (and updated)
|
| | |